
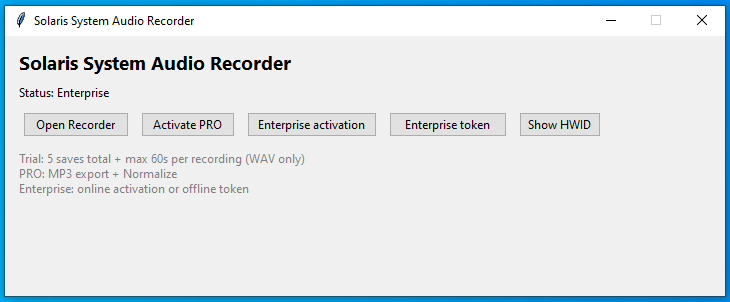
Solaris System Audio Recorder (SAR) is a professional-grade audio recording tool designed to capture high-quality system sound without the need for virtual cables or complex routing. Featuring studio-grade processing like Soft-Knee compression and Auto-Silence skipping.
What is Solaris SAR? 🚀
Solaris SAR is a professional-grade tool designed for:
- High-fidelity system audio capture using WASAPI Loopback technology.
- Documentation of audio outputs for meetings, webinars, and streams.
- Technical audio analysis with real-time visual feedback.
- Studio-quality archiving of online content.
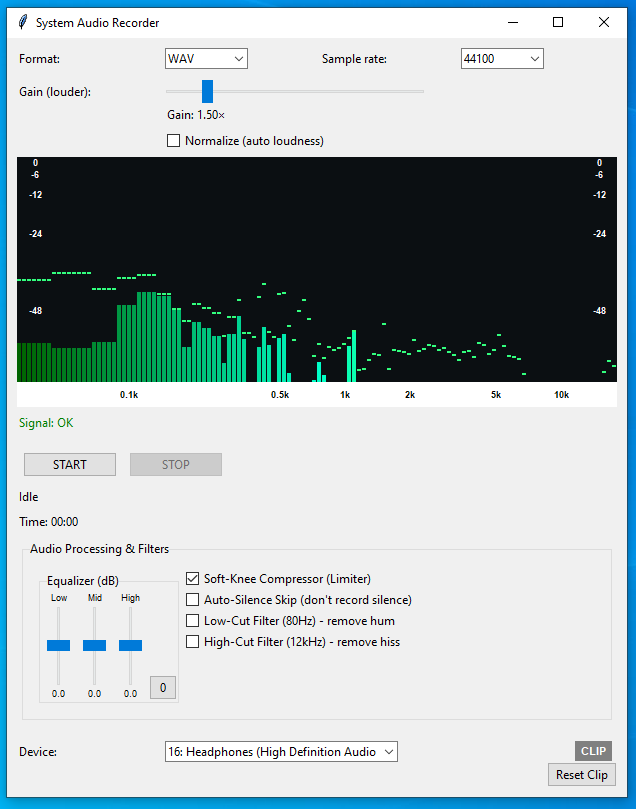
Interface Overview 🧭
The application features a modern, single-window interface designed for efficiency:
- Top Section: Device selection and audio format configuration.
- Visualizer: Real-time FFT spectrum analyzer with Peak Hold.
- Middle Section: Recording controls and professional audio processing.+1
- Bottom Section: Status monitoring, timers, and signal indicators.
Audio Configuration & Setup 🎚️
🔊 Audio Device Selection
Select the source for your recording. Solaris SAR automatically detects active loopback devices (Speakers or Headphones), ensuring you record exactly what you hear without virtual cables
📉 Format & Quality
Sample Rate: Choose between 44100Hz (CD standard) or 48000Hz (Professional video standard).
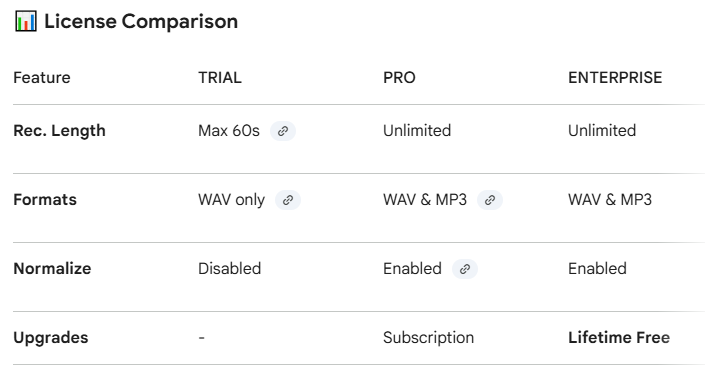
WAV: Lossless studio quality (Available in all versions).
MP3: High-quality compressed format (PRO/Enterprise versions only).
Recording Control 🔘
▶️ Start Recording
Starts recording system audio.
After starting:
- the recording timer starts
- SAR saves audio in real time
- the application state switches to recording mode
Use:
- before starting a video, stream, or presentation
- when starting a test or analysis
⏹ Stop Recording
Stops recording.
After stopping:
- the recording is saved
- the application is ready for another recording
Volume Adjustment – Gain 🎚️
🔊 Gain (Louder)
The Gain slider is used to amplify or attenuate the recorded sound.
- positive values → amplification
- negative values → attenuation
👉 Useful if the source sound is:
- too quiet
- too loud
- uneven
Normalize – Volume Equalization 🎛️
🔁 Normalize
The Normalize button is used to:
- automatically equalize the volume of the recording
- remove differences between quiet and loud parts
Typical uses:
- recording presentations
- instructional videos
- archiving content
👉 Normalize is applied to the entire recording.
Recording Time ⏱️
During recording, SAR displays:
- current recording time
- recording length overview
This is especially important:
- for long recordings
- for time-limited recordings
- for documentation and business tasks
Step-by-Step Guide 🪜
1️⃣ Audio device
Select the correct system audio source (Speakers or Headphones from the list).
2️⃣ Adjust volume
Adjust Gain or enable Normalize for consistent volume.
3️⃣ Start Recording
Click the START button.
4️⃣ Track time and status
You can keep track of the progress while recording.
5️⃣ Stop & Save
Click STOP. The app will automatically process your audio with Soft-Knee logic and prompt you to save the file.
SAR for individuals 👤
For individuals, SAR is ideal for:
- for personal audio archiving
- for study and education
- for creating your own content
Examples:
- recording online courses
- archiving important streams
- study notes in the form of audio
Benefits od SAR for companies 🏢
In companies, SAR serves as:
- an internal documentation tool
- technical audio recording
- support for training and education
Typical scenarios:
- recording internal training
- documenting online meetings
- technical application tests
- archiving system outputs
Benefits for companies:
- easy to use
- no external devices
- consistent recording quality
- quick deployment
Tips for quality recording 💡
- test the volume before recording
- avoid clipping
- use Normalize for uniform volume
- close applications that could interfere with the sound
🏢 Enterprise Benefits
For corporate environments, Solaris SAR provides:
Offline Activation: Enterprise tokens allow activation on secure machines without internet access.
Internal documentation of online meetings.
Technical recording for application testing.
💎 Professional Audio Features
🔊 Gain Control & Normalize
- Gain Slider: Manually boost the recording volume up to 10×.+1
- Normalize: Automatically adjusts the volume to a professional -0.5 dB peak. This feature is intelligent—it ignores background noise and only boosts actual content.+1
🔴 CLIP Indicator & Reset
If the incoming signal is too loud and risks distortion, the CLIP light will turn red.
- Studio Rule: If the CLIP light is on, consider lowering the Gain.
- Reset: Use the Reset Clip button to clear the warning after adjusting levels.
🍦 Soft-Knee Compressor (Always On)
Your recordings are protected by a studio-grade Soft-Knee compressor. Instead of harsh digital clipping, it gently “softens” loud peaks above 0.75, resulting in a smoother, more analog sound.+1
🔇 Auto-Silence Skip
Enable this to prevent recording long periods of silence.
How it works: If no audio is detected for more than 2 seconds, the app intelligently pauses data capture, saving significant disk space
Summary 🎯
Solaris System Audio Recorder is:
- simple
- accurate
- technically reliable
It is the ideal choice wherever you need to record system audio quickly and in a controlled manner – whether as an individual or in a corporate environment.