
System Audio Recorder — User Guide
Learn how to use SAR step by step, understand the main window and recorder window, and configure recording, filters, and licensing correctly.
Main Window · Recorder Window · Recording Setup · Audio Filters · Workflow · Trial & Licensing · Troubleshooting
Main Window Overview
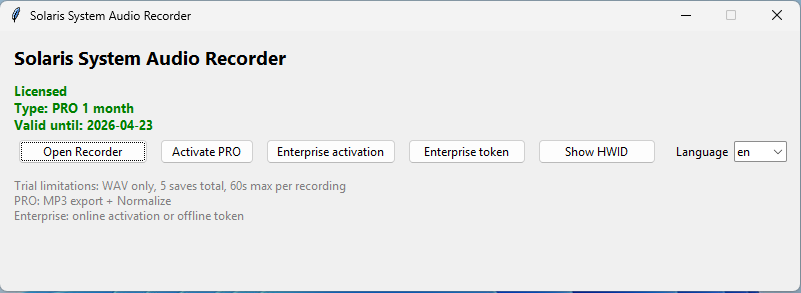
The main SAR window gives you quick access to recording, licensing, hardware identification, and language settings. It acts as the control center before you open the recorder itself. The main window includes Open Recorder, Activate PRO, Enterprise activation, Enterprise token, Show HWID, and the Language selector.
Open Recorder
Opens the recorder window where audio capture and processing take place.
Activate PRO
Opens the standard term-license activation flow.
Enterprise activation / Enterprise token
Provide access to online or offline enterprise activation.
Show HWID
Displays the hardware ID used for license binding and support purposes.
Language
Lets you switch the interface language and then restart the application to fully apply the change.
Main Window Controls
Application access
Open Recorder
Click Open Recorder to open the dedicated recorder window. This is where actual monitoring, recording, saving, and audio processing happen. If the app is in a blocked trial/licensing state, opening the recorder may be limited.
Licensing and language
Activate PRO
Use Activate PRO to activate a standard Pro license. This opens the term-license activation dialog and refreshes the application status after a successful activation.
Enterprise activation
Use Enterprise activation for online enterprise activation. This is intended for enterprise customers using the online activation flow
Enterprise token
Use Enterprise token for offline enterprise activation with a token-based workflow. This should be included in the guide even if you do not highlight it on the page navigation, because it exists in the real UI.
Show HWID
Click Show HWID to view the device hardware ID used for license binding and support-related checks.
Language
Use the Language dropdown to select the interface language. SAR saves the chosen value and asks for an application restart so the change can apply correctly. Available languages in the code are cs, en, de, fr, it, es.
Recorder Window Overview
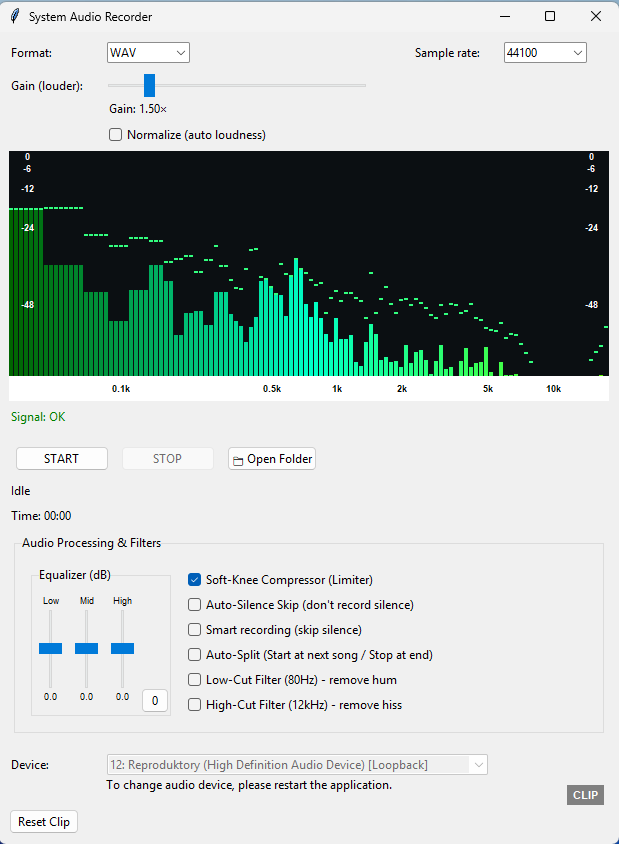
The recorder window is the main working area of SAR. It contains recording format and sample-rate settings, gain and normalization controls, the live signal visualization, start/stop controls, audio-processing filters, device information, and clip monitoring. The recorder window opens from the main window and is the place where recording actually takes place.
Top settings area
Contains Format, Sample rate, Gain, and Normalize.
Live monitoring area
Contains the waveform/spectrum display and the Signal status text.
Recording controls area
Contains Start, Stop, Open Folder, Idle/Recording/Processing status, and Time.
Audio Processing & Filters area
Contains equalizer, compressor, silence handling, auto-split, filters, device section, and clip/reset controls.
Recording Setup Controls
Format
Use Format to choose the output file type for the recording. In trial mode, SAR only allows WAV. In Pro mode, WAV and MP3 are available
Sample rate
Use Sample rate to choose the recording sample rate. The available values in the recorder are 44100 and 48000. This affects how audio is captured and saved.
Gain (Louder)
Use Gain (Louder) to manually amplify the recorded signal. The slider ranges from 0.0 to 10.0, and the current multiplier is shown below the slider. Use it when you need a stronger recording level and Normalize is not enabled.
Normalize (auto loudness)
Enable Normalize (auto loudness) to automatically raise the signal toward a controlled target level instead of relying only on manual Gain. In trial mode, this checkbox is disabled.
Signal
The Signal status tells you whether SAR currently detects usable audio. It can display states such as Signal: OK, Signal: Silent, or the waiting state before clear monitoring starts. This helps you confirm whether the recorder is receiving sound from the current loopback source.
Recording Controls and Status
Start
Click Start to begin recording. Depending on the selected automation options, SAR may start recording immediately, wait for sound, or wait for the next track/silence condition before actively storing audio.
Stop
Click Stop to stop the current recording session. SAR then processes the recorded data and proceeds to save it. In Auto-Split workflows, stop behavior can also be triggered automatically by silence detection.
Open Folder
Click Open Folder to open the default recordings folder. SAR uses the Music\SAR_Recordings folder and creates it automatically if it does not already exist.
Idle
The status text shows whether the recorder is idle, recording, waiting for audio, waiting for the next track, or processing. This is one of the most important real-time indicators in the recorder window.
Time
The Time indicator shows the current recording duration. In standard recording mode it reflects elapsed recording time; in Smart/Auto-Split-related flows it can reflect the amount of audio actually written into the recording buffer. Trial mode also stops recording automatically when the limit is reached.
Audio Processing & Filters
Equalizer
The Equalizer provides separate Low, Mid, and High controls in dB. Use these sliders to shape the tonal balance of the captured audio. A reset button returns all three bands to 0.
Soft-Knee Compressor (Limiter)
Enable Soft-Knee Compressor (Limiter) to reduce harsh peaks more smoothly instead of letting sudden peaks pass unchanged. This helps control loud transients and can improve recording consistency. It is enabled by default in the recorder state.
Auto-Silence Skip (don’t record silence)
Enable Auto-Silence Skip when you want SAR to stop or skip long silent sections instead of continuing a silent recording. In normal mode, extended silence can trigger stop behavior after a configured silence duration.
Smart recording (skip silence)
Enable Smart recording when you want SAR to write audio only when meaningful sound is present. This helps avoid recording silence into the saved file
Auto-Split (Start at next song / Stop at end)
Enable Auto-Split when you want SAR to separate recordings by track-like silence gaps. In this mode, SAR can wait for silence, wait for the next sound, record the current song, save it automatically, and then wait again for the next track.
Low-Cut Filter (80Hz) — remove hum
Enable Low-Cut Filter (80Hz) to reduce low-frequency hum and rumble. This is useful when the source contains unwanted low-end noise.
High-Cut Filter (12kHz) — remove hiss
Enable High-Cut Filter (12kHz) to reduce high-frequency hiss. This may help with noisy sources or recordings that sound overly harsh.
Device
The Device section shows the current loopback input source used by SAR. In the current UI, the device selector is disabled and SAR displays a note that changing the audio device requires restarting the application.
Reset Clip
Click Reset Clip to clear the clip warning indicator after clipping has been detected.
Clip
The Clip indicator warns you when the signal has reached a level close to clipping. If clipping is detected, the indicator turns red until it is reset. This is useful for monitoring excessive gain or overly strong signal peaks.
How to Record Step by Step
Follow the steps below to configure SAR correctly and save a recording successfully.
Step 1 — Open the recorder
Open the application and click Open Recorder in the main window. This opens the dedicated recorder interface where all recording controls are located.
Step 2 — Choose format and sample rate
Select the desired Format and Sample rate at the top of the recorder window. In trial mode, only WAV is available, while Pro mode also unlocks MP3.
Step 3 — Set gain and loudness behavior
Adjust Gain (Louder) if needed. If you want SAR to manage loudness more automatically, enable Normalize (auto loudness), keeping in mind that Normalize is disabled in trial mode.
Step 4 — Check the signal
Look at the live monitor and the Signal text. Confirm that SAR detects usable audio before you begin. If the signal remains silent, check the active playback source and restart the application if you need SAR to detect a different output device.
Step 5 — Configure optional filters and automation
If needed, adjust the Equalizer, enable the Soft-Knee Compressor, and turn on Smart recording, Auto-Silence Skip, Auto-Split, or the cut filters depending on your intended workflow.
Step 6 — Volume is set to 100%
When recording system audio with SAR, make sure the playback application’s own volume is set to 100%. If the player volume is lower, the recorded signal will also be reduced and the saved recording may sound quieter than the original source. The Windows master output volume in the bottom right bar does not affect SAR in the same way, but the playback volume inside the source application does.
Step 7 — Start recording
Click Start. SAR begins monitoring and recording according to the current mode and automation settings. The status text and time indicator update while recording runs.
Step 8 — Stop and save
Click Stop when you want to end the recording, or let SAR stop automatically if your chosen automation mode triggers stop behavior. SAR then processes the recorded data and asks where to save it, unless an automatic save path is being used in Auto-Split flow.
Step 9 — Review the saved result
After saving, open the recordings folder and review the result. If you exported MP3, SAR uses FFmpeg to encode the final file. If the recording finished in trial mode, trial consumption is checked only after a successful physical save.
Trial, PRO, and Enterprise
Trial
SAR trial mode allows limited recording use, with WAV only, Normalize disabled, and a maximum of 60 seconds per recording. The main window also states that the trial has a limited total number of saves.
PRO
Pro unlocks MP3 export and Normalize. Pro activation is started through Activate PRO in the main window.
Enterprise
Enterprise supports online activation and offline token activation from the main window. Enterprise also unlocks Pro-level features through enterprise licensing state
Show HWID
Use Show HWID whenever you need the device identifier for license support or activation-related workflows.
Troubleshooting and Practical Tips
No signal is detected
Check that audio is really playing on the current Windows output device. SAR works with loopback capture, so if the wrong output is active, the recorder may remain silent. Restart the application if you need SAR to detect a different output device
The recording clips or sounds too loud
Lower Gain or use Normalize and the Soft-Knee Compressor more carefully. Reset the clip indicator with Reset Clip after adjusting the levels.
Silence handling does not behave as expected
Review whether Auto-Silence Skip, Smart recording, or Auto-Split is enabled. These settings change when SAR stores audio, waits for sound, stops, or starts a new automatic segment.
The recording is quieter than the original
See Step 6 in the Section How to Record Step by Step
MP3 is unavailable
MP3 export is not available in trial mode. Activate Pro or Enterprise to unlock it.
Normalize is unavailable
Normalize is disabled in trial mode and becomes available with Pro or Enterprise features
ℹ Legal and Technical Note
SAR includes components based on FFmpeg under its applicable license terms. Support for optional external tools is user-provided. The application itself is designed as a workflow and processing environment.
Ready to try SAR?
Start with the trial version, explore the recorder step by step, and choose the licensing option that fits your workflow.